Writing properties for ink! contracts
Adding properties
Inside your Cargo.toml
First, you need to add the phink feature to your Cargo.toml, such as:
[features]
phink = []
Inside your file.rs
Then, you can use the following example to create invariants. Create another impl in your contract, and
put
it under the feature of phink. Use assert! or panic! for your properties.
#![allow(unused)]
fn main() {
#[cfg(feature = "phink")]
#[ink(impl)]
impl DomainNameService {
    // This invariant ensures that nobody registed the forbidden number
    #[ink(message)]
    #[cfg(feature = "phink")]
    pub fn phink_assert_dangerous_number(&self) {
        let forbidden_number = 42;
        assert_ne!(self.dangerous_number, forbidden_number);
    }
}
}
You can find more informations in the page dedicated to invariants.
Running Phink
1. Instrument the contract
First things first: Let’s enable your contract for fuzzing. Run the following command to instrument your ink! smart contract:
cargo run -- instrument my_contract/
This step modifies the contract to include necessary hooks for Phink’s fuzzing process. It creates a fork of the contract, so you don’t have to make a copy before.
2. Generate seeds (optionnal but highly recommended)
The cargo run -- generate-seed command is an optional but powerful feature that enhances your fuzzing experience by
generating initial seeds from your existing unit and end-to-end (E2E) tests.
What it Does
cargo run -- generate-seed executes the unit tests and E2E tests of your ink! smart contract, extracting seeds based
on
executed messages. These seeds are saved in the corpus/ directory, which highly helps to reach good coverage, as long
as you have good tests.
Therefore, we encourage to have good and various unit-tests and E2E tests in your contract.
How It Works
-
Unit Tests: The command runs through all defined unit tests and captures the invoked messages, with Alice as the origin and a value of 0.
-
End-to-End Tests: For E2E tests, Phink modifies the
Cargo.tomlto point to a custom ink! repository. This step ensures necessary modifications are included to print debug messages containing the message’s 4-byte hash and scale-encoded parameters to stdout. -
If a test invokes at least one message, Phink extracts them all as seeds for use during fuzzing.
Usage
cargo run -- generate-seed <CONTRACT> [COMPILED_DIRECTORY]
<CONTRACT>: The root directory path of your ink! smart contract.[COMPILED_DIRECTORY]: Optional path for where the temporary contract will be compiled. Defaults totmpif unspecified.
This will generate a set of initial inputs, derived from your current tests, to kickstart fuzzing.
Why using generate-seed?
Generating seeds from your existing test suite can increase the efficiency of fuzz testing by:
- Providing a good starting point for fuzzing inputs.
- Ensuring that the fuzzing process begins with valid and meaningful test cases.
For more information on how seeds work with Phink, refer to the seeds documentation.
3. Run the fuzzer
After instrumenting your contract and writing properties and configuring your phink.toml, let’s get our
hands on the fuzzing process:
cargo run -- fuzz
After executing this command, your fuzzing tests will begin based on the configurations specified in your phink.toml
file. You should see a user interface appear.
If you’re utilizing the advanced UI, you’ll receive real-time updates on the fuzzed messages at the bottom of the screen. For more detailed log information, you can use the following command:
watch -c -t -n 0.5 "clear && cat output/phink/logs/last_seed.phink" # `output` is the default, but it depends of your `phink.toml`
This will provide you with clearer logs by continuously updating them every 0.1 seconds.
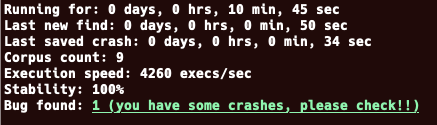
Analyzing results
Crashes
In case of crashes, you should see something like the following.
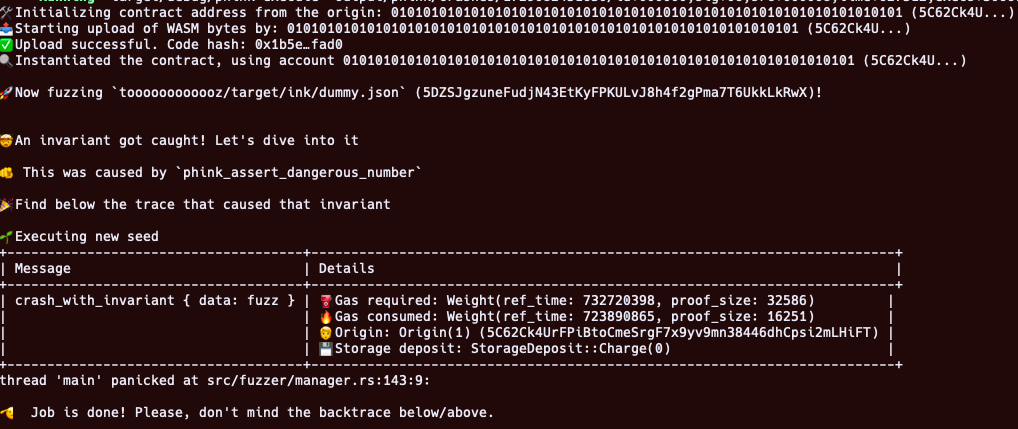
To analyze the crash, you can run cargo run -- execute <your_crash>, for instance
cargo run -- execute output/phink/crashes/1729082451630/id:000000,sig:06,src:000008,time:627512,execs:3066742,op:havoc,rep:2
| Component | Description |
|---|---|
| 1729082451630 | Timestamp representing when the crash was recorded |
| id:000000 | Unique identifier for the crash |
| sig:06 | Signal number that triggered the crash |
| src:000008 | Source test case number |
| time:627512 | Execution time since the start of the testing process |
| execs:3066742 | Cumulative number of executions performed until the crash |
| op:havoc,rep:2 | Type of fuzzing operation (havoc) and its repetition number |
By running the above command, you should get an output similar to the screenshot below:
Coverage
This feature is in alpha and unstable.
Generating a coverage report
First, you need to create a traces.cov file. For this, execute the command below.
cargo run -- run
Once done, generate coverage reports to analyze which parts of the contract were tested:
cargo run -- coverage my_contract/
Some HTML files should then be generated in the path you’ve configured inside your phink.toml. The coverage report
provides a visual representation of the tested code areas. As a rule of thumb, the more green lines you can see there,
the better it is for the code.
Coverage report example
Green Lines: Code that has been tested.
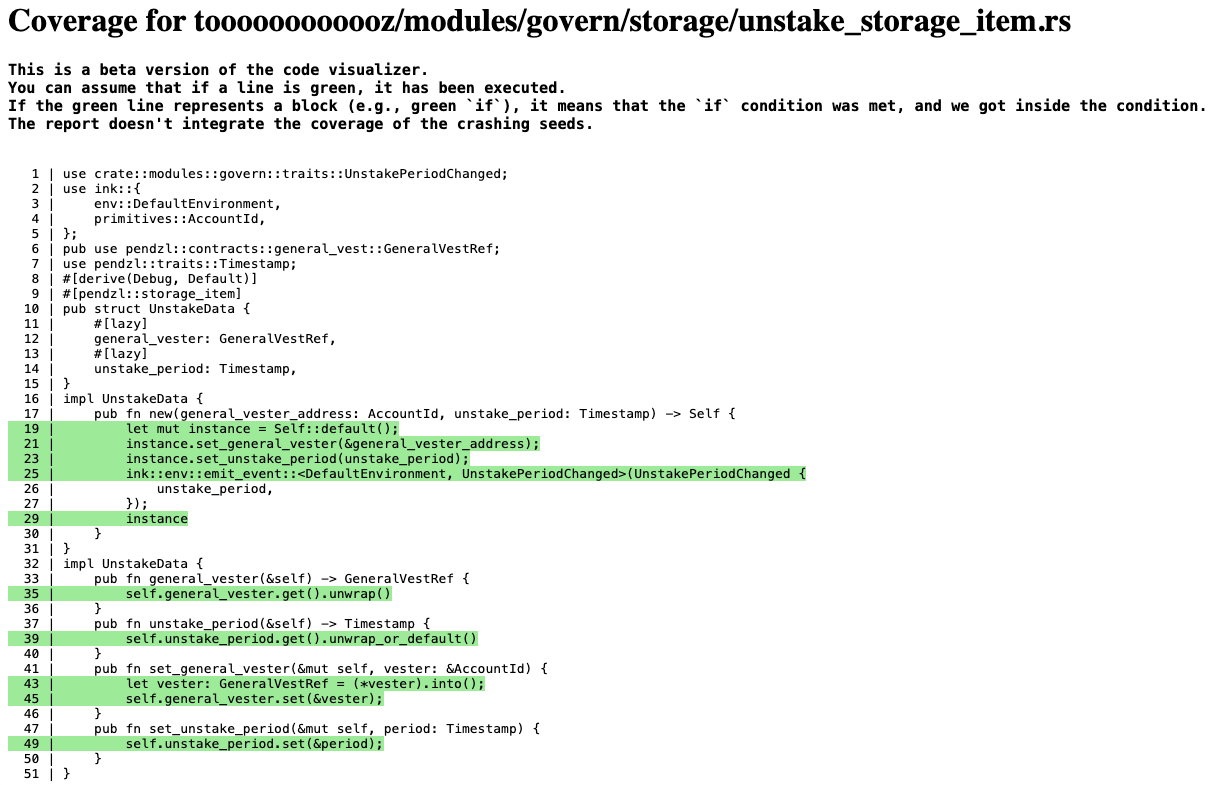
Figure 1: Coverage Report of one specific file.
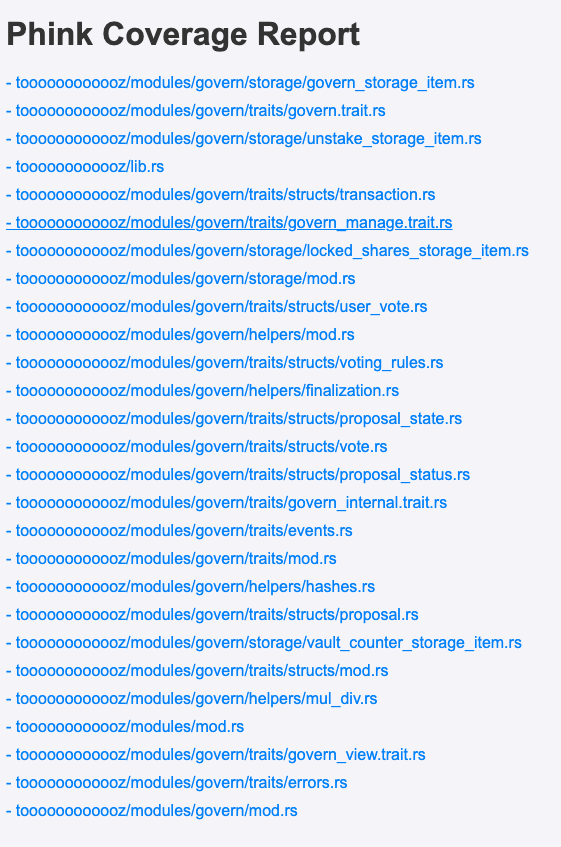
Figure 2: List of fuzzed Rust files from the ink! smart-contract.