
Introduction
Overview of Phink
Phink is a blazing-fast⚡, property-based, coverage-guided fuzzer for ink! smart contracts. It lets developers embed inviolable properties into smart contract testing workflows, equipping teams with automatic tools to detect vulnerabilities and ensure contract reliability before deployment.
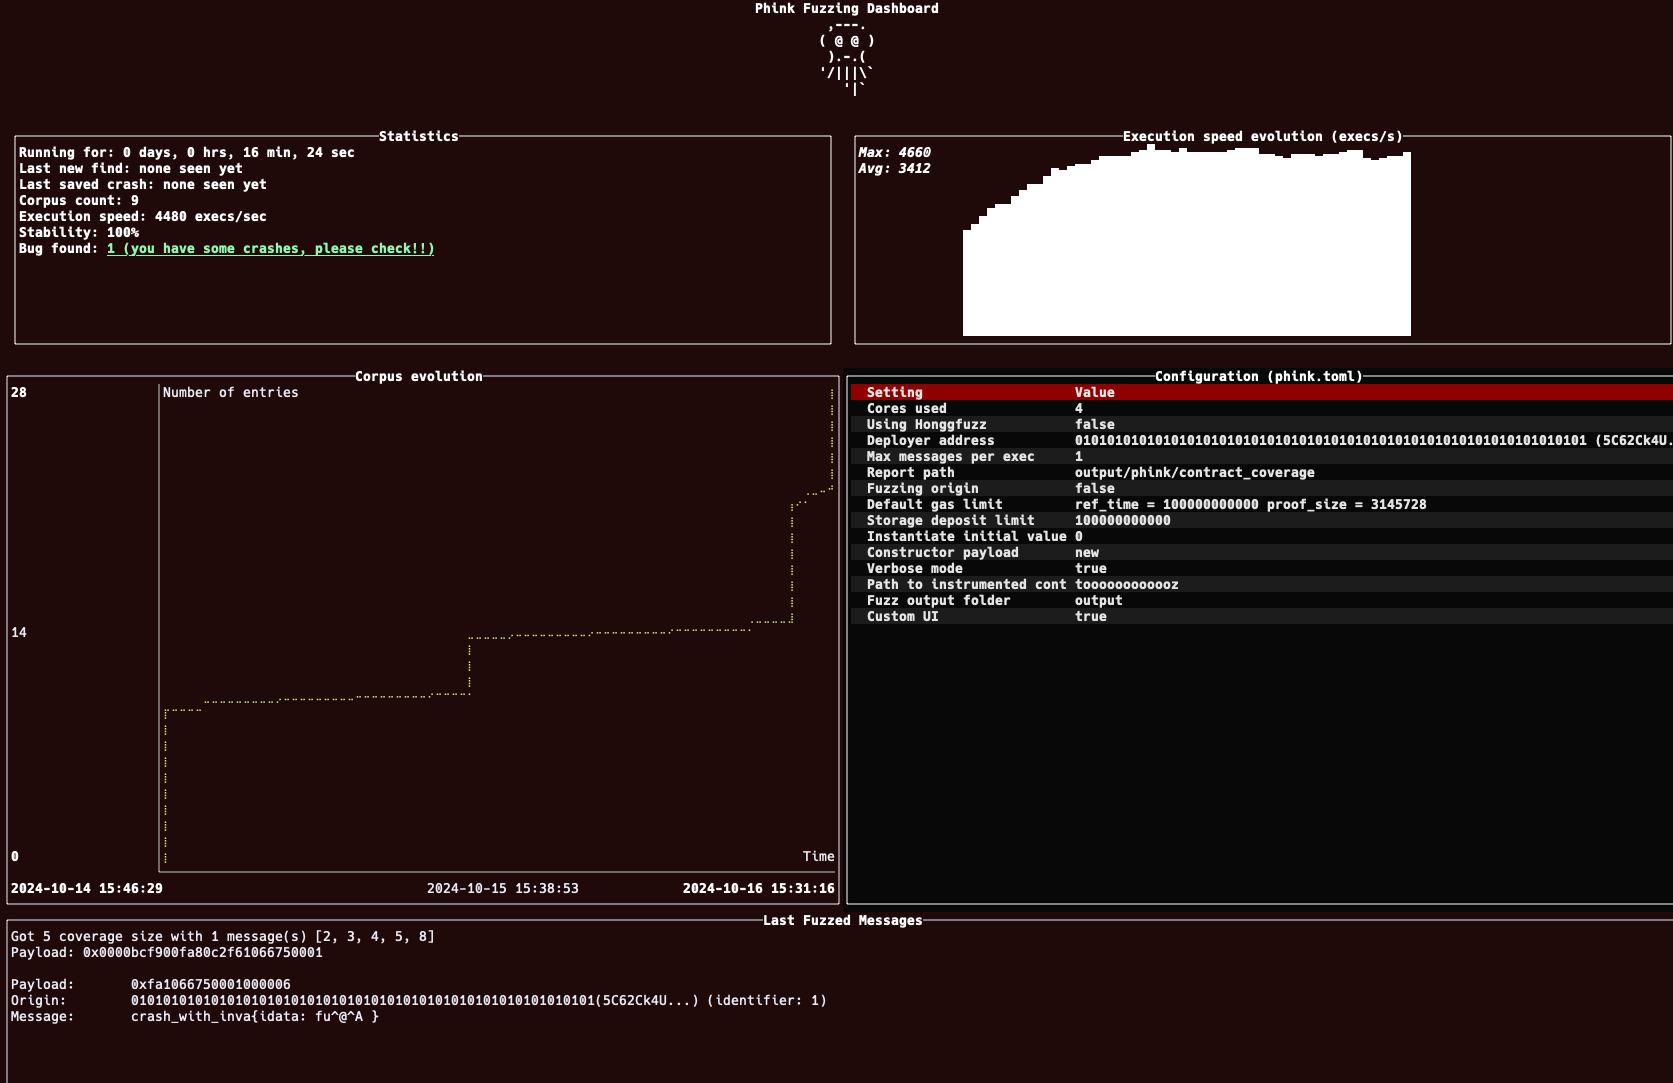
Dashboard overview
Key features
Property-based testing
Phink requires developers to define properties directly within ink! smart contracts. By prefixing functions with
phink, such as fn phink_assert_abc_always_true(), you create properties that
act as assertions. During testing, the fuzzer checks these properties against every input, which is a set of ink!
messages. If a
property’s assertion fails, this
triggers a panic. An invariant has been broken! This method ensures thorough validation of contract logic
and behavior.
Coverage-guided fuzzing
In order to become coverage-guided, Phink needs to instrument the ink! smart contract.
Feedback is transmitted to the pallet_contract via the debug_message.
Although the fuzzer
currently adds feedback on each line executed, Phink is designed to evolve. It will eventually monitor coverage across
new
edges and code branches.
Why use Phink
Phink addresses security concerns in these three main ways:
- Automatically generate and test a diverse range of inputs
- Detect edge cases, logical flaws, and bugs leading to contract state reversion
- Explore different execution paths by generating input mutation
This extensive testing identifies bugs and potential flaws early in the development cycle, empowering teams to fix vulnerabilities before deployment and deliver safer applications.
Getting started with Phink
Installation
System requirements
To successfully install and run Phink, ensure your system meets the following requirements:
-
Operating System:
- Linux: Recommended for compatibility
- macOS: Not recommended as it doesn’t support some AFL++ plugins
- Windows: Untested
-
Rust:
- Version: Rust nightly
- Current Compatibility:
cargo 1.83.0-nightly (ad074abe3 2024-10-04)
Installation guide
You can install Phink by building it from the source or by using Docker. Choose the method that best suits your setup and IT environment. Let’s jump right into it!
Building from source
Follow these 5 easy steps:
-
Clone the Repository
git clone https://github.com/srlabs/phink && cd phink/You can also run the following command:
cargo +nightly install --git https://github.com/srlabs/phink -
Install Dependencies
cargo install --force ziggy cargo-afl honggfuzz grcov cargo-contract --locked -
Configure AFL++
cargo afl config --build --plugins --verbose --force sudo cargo-afl afl system-config -
Build Phink
cargo build --release -
Run Phink
cargo run -- help
Using Docker
-
Build the Docker Image To build the Phink Docker image, run the following command in your terminal:
docker build -t phink .
For detailed Phink Docker installation instructions, refer to README.Docker.md.
Basic workflow
Follow these three high-level steps:
-
Instrument the contract
- Use Phink to instrument your ink! smart contract for fuzzing
-
Configure fuzzing parameters
- Edit the
phink.tomlfile to set paths, deployment settings, and fuzzing options according to your project needs
- Edit the
-
Run your fuzzing campaign
- Execute fuzzing with your configured settings to identify vulnerabilities early in the development cycle
Phink configuration guide
This guide provides an overview of the Phink configuration settings. You will learn how to configure the general settings, specify some key paths and fuzzing options, and do some other essential tasks. Without further ado, let’s jump right into it!
Configuration file overview
Here’s how a configuration file looks like:
### Phink Configuration

# General Settings
cores = 10                # Set to 1 for single-core execution
max_messages_per_exec = 1 # Maximum number of message calls per input

# Paths
instrumented_contract_path.path = "toooooooooooz"  # Path to the instrumented contract, after `phink instrument my_contract` is invoked
report_path = "output/phink/contract_coverage" # Directory for coverage HTML files
fuzz_output = "output"                         # Directory for fuzzing output

# Deployment
deployer_address = "5C62Ck4UrFPiBtoCmeSrgF7x9yv9mn38446dhCpsi2mLHiFT" # Contract deployer address (Alice by default)
constructor_payload = "9BAE9D5E"                                     # Hexadecimal scale-encoded data for contract instantiation
storage_deposit_limit = "100000000000"                              # Storage deposit limit
instantiate_initial_value = "0"                                     # Value transferred during instantiation, if needed

# Fuzzing Options
fuzz_origin = false  # Attempt to call each message as a different user (affects performance)
verbose = true       # Print detailed debug messages
show_ui = true       # Display advanced UI
use_honggfuzz = false # Use Honggfuzz (set as false)
catch_trapped_contract = false # Not setting trapped contract as a bug, only detecting invariant-based bugs

# Gas Limits
[default_gas_limit]
ref_time = 100_000_000_000      # Reference time for gas
proof_size = 3_145_728          # Proof size (3 * 1024 * 1024 bytes)
General settings
The General settings cover these 2 parameters:
- cores: Allocate the number of CPU cores for fuzzing. Setting this to
1enables single-core execution. We * highly* not recommend using single-core, since this will dissalowCMPLOGfeature from AFL++. - max_messages_per_exec: Define the maximum number of message calls allowed per fuzzing input. If you want to fuzz one function per one function, set this number to 1. Setting it to zero will fuzz zero message. Setting it, for example, to 4 will generate 4 different messages in one input, run all the invariants, and go to the next input.
Paths
The Paths settings cover these 3 parameters:
- instrumented_contract_path.path: Specify the path to the instrumented contract, which should be set
post-invocation of
phink instrument my_contract. This path will contain the source code of the initial contract, with the additional instrumentation instructions. It will also contain the instrumented compiled contract. - report_path: Designate the directory where HTML coverage reports will be generated if the user wishes to generate a coverage report.
- fuzz_output: Indicate the directory for storing all fuzzing output. This output is important as it will contain the log file, the corpus entries, the crashes, and way more.
Deployment
The Deployment settings include these 4 parameters:
- deployer_address: Set the address of the smart contract deployer. The default is Alice’s address.
- constructor_payload: Hexadecimal scale-encoded data necessary for contract instantiation. This is used when
calling
bare_instantiateextrinsic to instantiate the contract. You can use https://ui.use.ink/ to generate this payload. By default, Phink will deploy the contract using the constructor that has no argumentsnew(). - storage_deposit_limit: Limit for storage deposits during contract deployment. It represents an optional cap on the amount of blockchain storage (measured in balance units) that can be used or reserved by the contract call.
- instantiate_initial_value: Initial value to be transferred upon contract instantiation if required. So if the contract requires a minimum amount of 3000 units during instantiation, set 3000 here.
Fuzzing options
These 4 parameters are important when you configure fuzzing options:
- fuzz_origin: A Boolean option to try calling each message as a different user, which may impact performance. If
set to
false, the fuzzer will fuzz any message with the one input (Alice). - verbose: Enables detailed debugging of messages when set to
true. This will just output more logs. - show_ui: Toggle for displaying the advanced user interface.
- use_honggfuzz: Determines whether to use Honggfuzz; remains
falseby default. (let it false! is not handled currently) - catch_trapped_contract: Indicate whether the fuzzer should treat trapped contracts as bugs.
- When set to
true: The fuzzer will identify any contracts that become trapped (ContractTrapped) as bugs. This is useful for an examination of potential issues, as it covers all types of bugs, not just ones related to logic or state invariants. - When set to
false: Focuses only on catching bugs related to invariant violations, ignoring trapped contract scenarios. This is preferable when you are only interested in logical correctness and not in trapping errors.
- When set to
Gas limit
The gas limit refers to the maximum amount of computational effort (or weight) that an execution is allowed to use when performing a call to a contract. It controls how much balance a contract is allowed to use for expanding its state storage during execution. The setting ensures that users won’t unintentionally spend more than they wanted on storage allocation. Besides, it offers protection against excessive storage costs by defining an upper limit on how much can be spent on storage within that call.
Default gas limit configuration
The key Gas limit settings include:
- ref_time: Specify the reference time for gas allocation.
- proof_size: Define the proof size (e.g.,
3145728corresponds to 3 MB).
Writing properties for ink! contracts
Adding properties
Inside your Cargo.toml
First, you need to add the phink feature to your Cargo.toml, such as:
[features]
phink = []
Inside your file.rs
Then, you can use the following example to create invariants. Create another impl in your contract, and
put
it under the feature of phink. Use assert! or panic! for your properties.
#![allow(unused)]
fn main() {
#[cfg(feature = "phink")]
#[ink(impl)]
impl DomainNameService {
    // This invariant ensures that nobody registed the forbidden number
    #[ink(message)]
    #[cfg(feature = "phink")]
    pub fn phink_assert_dangerous_number(&self) {
        let forbidden_number = 42;
        assert_ne!(self.dangerous_number, forbidden_number);
    }
}
}
You can find more informations in the page dedicated to invariants.
Running Phink
1. Instrument the contract
First things first: Let’s enable your contract for fuzzing. Run the following command to instrument your ink! smart contract:
cargo run -- instrument my_contract/
This step modifies the contract to include necessary hooks for Phink’s fuzzing process. It creates a fork of the contract, so you don’t have to make a copy before.
2. Generate seeds (optionnal but highly recommended)
The cargo run -- generate-seed command is an optional but powerful feature that enhances your fuzzing experience by
generating initial seeds from your existing unit and end-to-end (E2E) tests.
What it Does
cargo run -- generate-seed executes the unit tests and E2E tests of your ink! smart contract, extracting seeds based
on
executed messages. These seeds are saved in the corpus/ directory, which highly helps to reach good coverage, as long
as you have good tests.
Therefore, we encourage to have good and various unit-tests and E2E tests in your contract.
How It Works
-
Unit Tests: The command runs through all defined unit tests and captures the invoked messages, with Alice as the origin and a value of 0.
-
End-to-End Tests: For E2E tests, Phink modifies the
Cargo.tomlto point to a custom ink! repository. This step ensures necessary modifications are included to print debug messages containing the message’s 4-byte hash and scale-encoded parameters to stdout. -
If a test invokes at least one message, Phink extracts them all as seeds for use during fuzzing.
Usage
cargo run -- generate-seed <CONTRACT> [COMPILED_DIRECTORY]
<CONTRACT>: The root directory path of your ink! smart contract.[COMPILED_DIRECTORY]: Optional path for where the temporary contract will be compiled. Defaults totmpif unspecified.
This will generate a set of initial inputs, derived from your current tests, to kickstart fuzzing.
Why using generate-seed?
Generating seeds from your existing test suite can increase the efficiency of fuzz testing by:
- Providing a good starting point for fuzzing inputs.
- Ensuring that the fuzzing process begins with valid and meaningful test cases.
For more information on how seeds work with Phink, refer to the seeds documentation.
3. Run the fuzzer
After instrumenting your contract and writing properties and configuring your phink.toml, let’s get our
hands on the fuzzing process:
cargo run -- fuzz
After executing this command, your fuzzing tests will begin based on the configurations specified in your phink.toml
file. You should see a user interface appear.
If you’re utilizing the advanced UI, you’ll receive real-time updates on the fuzzed messages at the bottom of the screen. For more detailed log information, you can use the following command:
watch -c -t -n 0.5 "clear && cat output/phink/logs/last_seed.phink" # `output` is the default, but it depends of your `phink.toml`
This will provide you with clearer logs by continuously updating them every 0.1 seconds.
Analyzing results
Crashes
In case of crashes, you should see something like the following.
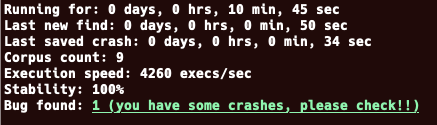
To analyze the crash, you can run cargo run -- execute <your_crash>, for instance
cargo run -- execute output/phink/crashes/1729082451630/id:000000,sig:06,src:000008,time:627512,execs:3066742,op:havoc,rep:2
| Component | Description |
|---|---|
| 1729082451630 | Timestamp representing when the crash was recorded |
| id:000000 | Unique identifier for the crash |
| sig:06 | Signal number that triggered the crash |
| src:000008 | Source test case number |
| time:627512 | Execution time since the start of the testing process |
| execs:3066742 | Cumulative number of executions performed until the crash |
| op:havoc,rep:2 | Type of fuzzing operation (havoc) and its repetition number |
By running the above command, you should get an output similar to the screenshot below:
Coverage
This feature is in alpha and unstable.
Generating a coverage report
First, you need to create a traces.cov file. For this, execute the command below.
cargo run -- run
Once done, generate coverage reports to analyze which parts of the contract were tested:
cargo run -- coverage my_contract/
Some HTML files should then be generated in the path you’ve configured inside your phink.toml. The coverage report
provides a visual representation of the tested code areas. As a rule of thumb, the more green lines you can see there,
the better it is for the code.
Coverage report example
Green Lines: Code that has been tested.
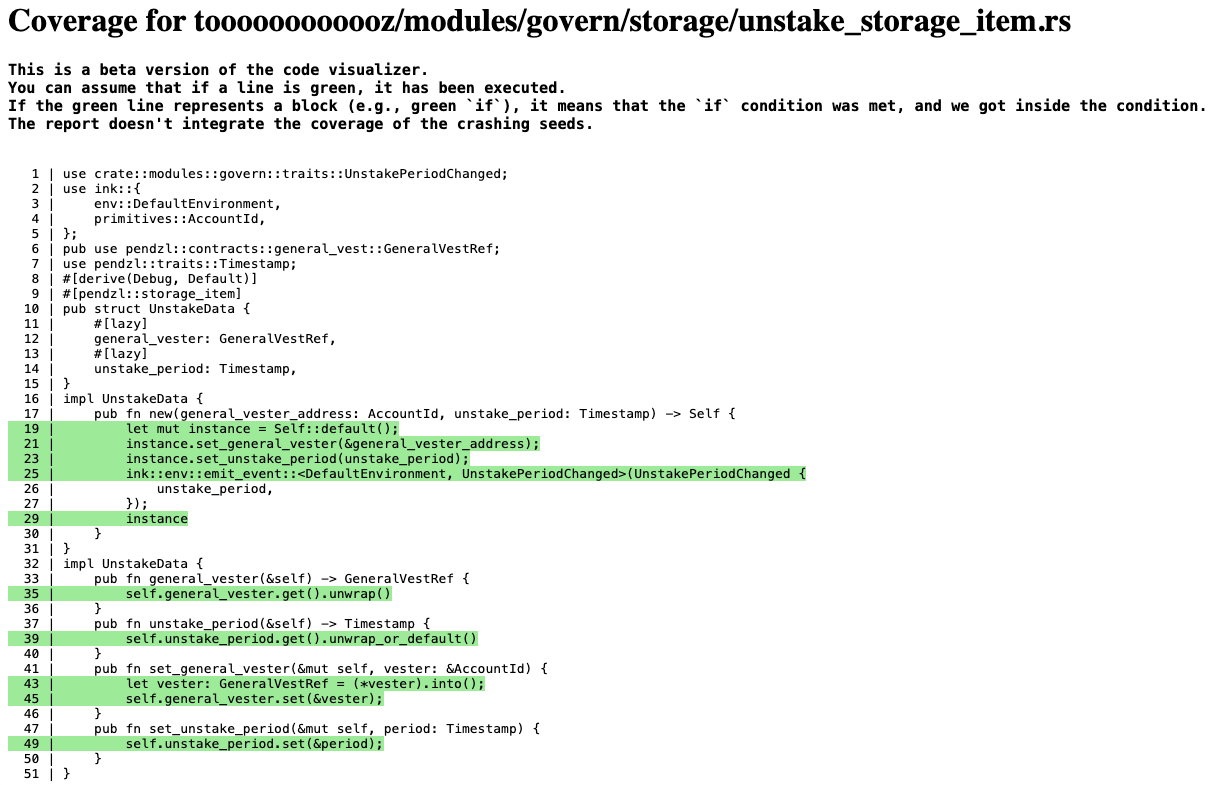
Figure 1: Coverage Report of one specific file.
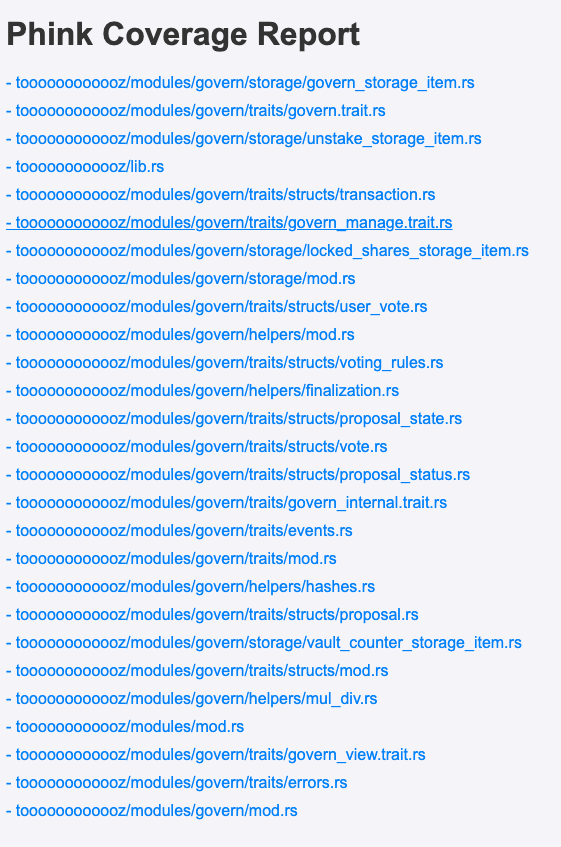
Figure 2: List of fuzzed Rust files from the ink! smart-contract.
Invariants
Invariants are fundamental properties that must always hold true in a smart-contract, regardless of any operations performed. They help ensure that certain logical conditions remain constant throughout the execution of the contract, preventing potential vulnerabilities and ensuring its reliability.
We suggest to use integrity and unit tests from your codebase to get inspiration to generate good invariants.
Creating good invariants for ink! smart-contracts
Below are some guidelines to help you design robust invariants:
-
Understand the Contract’s Logic: Before crafting invariants, deeply understand the core logic and expected behaviors of your smart contract.
-
Identify Critical Properties: Determine critical properties or conditions that must hold true. This could involve state variables, transaction outcomes, or other interdependent conditions.
-
Consider Corner Cases: Think about edge cases and potential attack vectors. Invariants should be designed to capture unexpected or extreme scenarios.
-
Focus on Consistency: Consider properties that ensure data consistency across state changes. This might involve ensuring balances are correctly updated or ownership is properly maintained.
-
Keep it Simple: While considering complex scenarios, ensure your invariants are straightforward to encourage maintainability and clarity.
Example invariant in ink! smart-contracts
Here is a template to get you started on writing invariants for ink! smart contracts:
#![allow(unused)]
fn main() {
#[cfg(feature = "phink")]
#[ink(impl)]
impl DomainNameService {
    /// Example invariant:
    #[ink(message)]
    #[cfg(feature = "phink")]
    pub fn phink_balance_invariant(&self) {
        // Ensure total supply equals sum of individual balances
        assert_eq!(self.total_supply, self.calculate_total_balances(), "Balance invariant violated!");
    }
}
}
Annotations explaination
#[cfg(feature = "phink")]: Ensures the function is only compiled when the “phink” feature is enabled.#[ink(message)]: Marks the function as an executable entry defined by the ink! framework.- Function Naming: Begin with “phink_” to indicate the purpose and correlation to fuzz testing.
Creating invariants with LLM
Large Language Models (LLMs) offer a good (lazy, yes…) approach to generate invariants by interpreting the logic and identifying properties from the contract code. Here is an example prompt system you could use to generate a base of invariants
System prompt
You are provided with Rust files containing an ink! smart contract. Your task is to generate invariants, which are
inviolable properties that a fuzzer will check to ensure the contract's quality and correctness. Please adhere to the
following requirements while writing the invariants:

1. Ensure that the `impl` block is annotated with `#[cfg(feature = "phink")] #[ink(impl)]`.
2. Confirm that the `impl DomainNameService` is the main implementation block of the contract.
3. Each invariant must be annotated with:
    - `#[ink(message)]`
    - `#[cfg(feature = "phink")]`
    - Function names must start with "phink_".
4. Each invariant function must contain at least one assertion statement, such as `assert`, `assert_ne`, `panic`, etc.
5. Be creative and consider corner cases to ensure the thoroughness of the invariants.

Output example:

```rust
#[cfg(feature = "phink")]
#[ink(impl)]
impl DomainNameService {
    // This invariant ensures that `domains` doesn't contain the forbidden domain that nobody should register
    #[ink(message)]
    #[cfg(feature = "phink")]
    pub fn phink_assert_hash42_cant_be_registered(&self) {
        for i in 0..self.domains.len() {
            if let Some(domain) = self.domains.get(i) {
                // Invariant triggered! We caught an invalid domain in the storage...
                assert_ne!(domain.clone().as_mut(), FORBIDDEN_DOMAIN);
            }
        }
    }
}
`` `
Sources in the prompt
If your contract is small enough and contains multiple Rust files, you could use the following snippet, to put
everything inside everything.rs.
find . -name "*.rs" -not -path "./target/*" -exec cat {} + > everything.rs
Copy paste the content after your system prompt, and examine the LLM invariants. Otherwise, simply copy paste the code
from your lib.rs
Runtime integration
Phink provides developers with the flexibility to customize their fuzzing environment through a simple interface. By
editing contract/custom/custom.rs and contract/custom/preferences.rs, developers can tailor the runtime storage and
contract initialization
processes to suit their testing needs. Have a clone of Phink if you want to modify the source code.
Custom runtime storage
Phink allows developers to tailor the runtime environment by customizing the storage configuration. Let’s create some realistic testing scenarios!
Example
impl DevelopperPreferences for Preferences {
    fn runtime_storage() -> Storage {
        let storage = RuntimeGenesisConfig {
            balances: BalancesConfig {
                balances: (0..u8::MAX) // Allocates substantial balance to accounts
                    .map(|i| [i; 32].into())
                    .collect::<Vec<_>>()
                    .iter()
                    .cloned()
                    .map(|k| (k, 10000000000000000000 * 2))
                    .collect(),
            },
            ..Default::default()
        }
            .build_storage()
            .unwrap();
        storage
    }
}
Customization points
runtime_storage: This function is your gateway to defining any mocks orRuntimeGenesisConfigsettings needed for your testing environment. Whether it’s allocating funds, initializing storage items, or setting up custom storage, you can adjust these configurations to mirror your deployment scenarios closely. This flexibility allows you to test how your ink! smart contract behave in various simulated network states.
Contract initialization
The on_contract_initialize function can be adapted to execute additional initialization logic, such as uploading
supplementary contracts or handling dependencies.
Usage example
fn on_contract_initialize() -> anyhow::Result<()> {
    Contracts::bare_upload_code(
        AccountId32::new([1; 32]),
        fs::read("adder.wasm")?,
        None,
        Determinism::Enforced,
    );
    Ok(())
}
Customization points
runtime_storage: Use this function as your gateway to defining any mocks orRuntimeGenesisConfigsettings needed for your testing environment. Whether it’s allocating funds, initializing storage items, or setting up custom storage, adjust these configurations to mirror your deployment scenarios closely. This flexibility lets you test how your ink! smart contract behaves in various simulated network states.
Contract initialization
The on_contract_initialize function can be adapted to execute additional initialization logic, such as uploading
supplementary contracts or handling dependencies.
Example
fn on_contract_initialize() -> anyhow::Result<()> {
    Contracts::bare_upload_code(
        AccountId32::new([1; 32]),
        fs::read("adder.wasm")?,
        None,
        Determinism::Enforced,
    );
    Ok(())
}
Customization points
on_contract_initialize: Use this function to automate contract uploads, configure dependencies, or perform any setup necessary before testing.
Custom runtime parameters
Phink provides default runtime configurations, but developers can provide their own runtime parameters in
contract/runtime.rs. This can be particularly useful if you wish to connect your fuzzing environment to your own
Substrate runtime, so Phink can be adapted to work with your specific runtime.
You can edit the runtime configure here.
Example: custom runtime configuration
For instance, customize the pallet_timestamp runtime parameters like this:
impl pallet_timestamp::Config for Runtime {
    type MinimumPeriod = CustomMinimumPeriod;
    ...
}
Seed format
In Phink, a seed is structured to guide the fuzzing process effectively. The seed is composed of these 4 parts:
- 4 bytes: Represents the balance value to be transferred to the message if it’s payable
- 1 byte: Specifies the origin; applicable if fuzzing origin is enabled in the configuration
- 4 bytes: Identifies the message selector
- Remaining bytes: Contains the SCALE-encoded parameters for the message
If your configuration allows more than one message per input, Phink uses the delimiter "********" to separate multiple
messages within a single input. This enables comprehensive testing across multiple scenarios from a single seed.
Example
Here’s a breakdown for the seed
0000000001fa80c2f6002a2a2a2a2a2a2a2a0000000103ba70c3aa18040008000f00100017002a00:
| Segment | Bytes | Description |
|---|---|---|
| Balance transfer | 00000000 | 4 bytes for balance (no transfer in this case) |
| Origin | 01 | 1 byte indicating the origin (Alice) (enabled in config) |
| Message selector 1 | fa80c2f6 | 4 bytes for the first message selector |
| Parameters 1 | 00 | SCALE-encoded parameters for the first message |
| Message delimiter | 2a2a2a2a2a2a2a2a | Delimits the first and second messages (********) |
| Balance transfer | 00000001 | 4 bytes for balance (1 unit transfered) |
| Origin | 03 | 1 byte indicating the origin (Charlie) for the second message |
| Message selector 2 | ba70c3aa | 4 bytes for the second message selector |
| Parameters 2 | 18040008000f00100017002a00 | SCALE-encoded vector: [4, 8, 15, 16, 23, 42] |
Explanation
- Balance transfer: The 4 bytes representing the balance transfer amount (set to
00000000for the first message), indicating no value is being transferred for either message. - Origin: A single byte is used (
01for the first message and03for the second) to specify the origin of the call. This is useful for testing scenarios with different origins. - Message selector: The first message, for example, begins with a 4-byte identifier (
fa80c2f6), indicating which message within the contract is being invoked. - Parameters: Following the message selector, SCALE-encoded parameters are specified (example:
00), representing the input data for each message. - Message delimiter: This seed uses the delimiter
********(represented as2a2a2a2a2a2a2a2a) to separate multiple messages within a single input, allowing more complex interactions to be tested.
Running one seed
To execute a single seed, use the following command:
cargo run -- execute my_seed.bin
This command runs the specific seed my_seed.bin, providing targeted fuzzing for individual transaction testing.
Running all the seeds
To run all seeds sequentially, use the following command:
cargo run -- run
This command iterates over the corpus folder, executing each seed. This ensures a comprehensive fuzzing process that
covers
all previously discovered cases.
Minimizing the corpus
To minimize the corpus folder containing seeds, use the following command:
cargo run -- minimize
The goal of the corpus minimization process is to streamline the set of seeds in the corpus folder, reducing it to the most essential and impactful test cases. Minimization makes fuzzing more efficient by eliminating redundant seeds, speeding up the speed and focusing only on seeds that reveal new or unique coverage.
What it does
cargo run -- minimize analyzes the seeds within the corpus and identifies those that are redundant
or do not contribute additional value to the fuzzing campaign. It executes each seed to determine their individual
impact
and removes any seeds that do not enhance coverage or expose new bugs. This results in a minimized set of seeds, savind
time time and
also optimizing resource usage.
Generating a seed
To generate a new seed, all you need to do is construct it using the prescribed format. Start with the required byte sequences for balance, origin, message selector, and parameters, and then save it in your designated seed directory.
Importance of seed generation
How can we detect and fix more potential
vulnerabilities and edge cases faster? The ability to manually create seeds is crucial for enhancing the effectiveness
of the fuzz testing process. By creating
custom seeds, developers can guide the fuzzer to explore paths and scenarios that might not be easily discovered through
automated means. This, in turn, increases the overall coverage of the fuzzing campaign. If you need to generate the
SCALE-encoded parameters, it’s best to
utilize tools like cargo contract
or Polkadot.js.
Adding a seed to the corpus
To add a custom seed to the corpus, use the following command:
cargo ziggy add-seeds -i my_custom_seeds/ -z output/
my_custom_seeds/: Directory containing your custom seedsoutput/: Directory where the fuzzing output is stored
Once added, the corpus will use these seeds in subsequent fuzzing processes.
Viewing and editing seeds
To view the hexadecimal content of a seed, issue the following command:
xxd -c 3000 -p output/phink/corpus/one_seed.bin > abc.out
This useful command converts the binary seed file into hex for easier reading and editing.
To edit a seed, complete these 3 easy tasks:
-
Open the hex file in your preferred editor, and edit it
vim abc.out -
Save the changes and revert the hex file to binary
rm seed.bin # Used to bypass cached seed xxd -r -p abc.out seed.bin -
Execute the updated seed
cargo run -- execute seed.bin
Congratulations! We’re off to the races again.
Concepts and terminology
Concepts
Fuzzing
Fuzzing is an automated software testing technique that involves providing random data inputs to a program. The primary goal is to uncover anomalies, such as crashes and assertion failures. These are intriguing because they pinpoint potential vulnerabilities.
Property-based fuzzing
Property-based testing involves specifying properties or invariants that your ink! contract should always satisfy. In Phink, these properties act as assertions. Phink makes it possible for developers to define properties directly within ink! smart contracts. Such properties are then tested against varied inputs. In this way, the contract maintains its invariants across all possible data conditions. But there is a final twist in the fuzzing tale.
Coverage-guided fuzzing
Coverage-guided fuzzing is a fuzzing strategy that focuses on maximizing code coverage during testing. It uses feedback from code execution paths to guide input generation, focusing on unexplored parts of the code. Phink instruments ink! smart contracts to track code coverage. Optimizing fuzzing efforts by targeting less examined paths is what makes the game worth playing.
Terminology
Corpus
A corpus refers to the collection of all input samples used during the testing process. It is continuously updated with new inputs that lead to unique execution paths.
Seed
A seed is an initial input provided to the fuzzer to start the testing process. Seeds serve as the starting point for generating new test cases and are crucial for initializing a diverse and effective fuzzing campaign. A strong set of seed inputs can significantly enhance the fuzzing campaign.
Invariants
Invariants are conditions or properties that must remain true at all times during the execution of a program or contract. In property-based testing, invariants are used as assertions to verify the consistent behavior of smart contracts under various input conditions. Breaking an invariant indicates a potential bug or vulnerability.
Instrumentation
Instrumentation involves modifying a program to collect runtime information such as code coverage data. In fuzzing, instrumentation traces execution paths, enabling coverage-guided techniques to generate more informed and effective test cases.
Coverage
Coverage measures how much of a program’s code is tested during fuzzing. High coverage corresponds to a good assessment of the contract’s logic.
Contract selectors
ink! contract selectors are unique identifiers for functions within ink! smart contracts. Selectors are derived from function signatures and are used to call specific functions within a contract deployed on the blockchain.
How Phink works
Phink is built on top of AFL++, leveraging its capabilities to provide effective fuzz testing for ink! smart contracts. Here’s an overview of how the fuzzer operates.
AFL++ integration
Phink utilizes AFL++ through two key components:
- ziggy: A multifuzzing crate that enables integration with multiple fuzzers.
- afl.rs: A crate that spawns AFL++ fuzzers, facilitating seamless mutation and coverage tracking.
AFL++ mechanics
AFL++ mutates the input bytes and evaluates whether these mutations increase code coverage. If a mutation results in new execution paths, the modified seed is retained in the corpus. This iterative process enhances the likelihood of discovering hidden vulnerabilities.
Monitoring execution
Users can monitor the execution logs using familiar AFL++ tools. For instance, by using tail, you can view real-time
fuzzer logs and activity:
tail -f output/phink/logs/afl.log
tail -f output/phink/logs/afl_1.log #if multi-threaded
Additionally, tools like afl_showmap allow developers to debug and visualize the coverage maps.
Coverage-guided strategy
Currently, Phink employs a partially coverage-guided approach. While full coverage feedback from low-level instrumentation is not available yet, plans are underway to integrate this capability via WASMI or PolkaVM in future releases.
Execution and validation
For each generated seed, Phink executes the associated input on a mock-emulated ‘node’. This setup ensures that invariants are verified: known selectors are checked to ensure that invariants hold across different message calls.
Contract instrumentation
Phink instruments contracts using the syn crate, allowing for precise modification and analysis of the smart contract
code. For each high-level Rust instructions, a feedback is returned via the debug_message map to the fuzzing engine, mapping each instruction to a unique u64 identifier. This map is then “expanded”, instrumented by AFL++ compiler, and ultimately updated the AFL++ shared map everytime a new edge is hit.
Troubleshooting
Debugging Phink
AFL++ logs
If you encounter unexpected behavior, examining the AFL++ logs can provide good insights. In most cases, developers will find more information by executing:
tail -f your_output/phink/logs/afl.log
Replace your_output with the directory defined in your phink.toml under fuzz_output. This will give you a
real-time view of the log output, helping you identify any issues during the fuzzing process.
Executing a Single Seed
To debug specific cases where a contract crashes, you can execute a single seed. This method allows you to instantiate a contract and identify crash points more easily:
cargo run -- execute output/phink/corpus/selector_1.bin
This command runs a single fuzzing input, making it easier to pinpoint problems.
Harness coverage
Use the harness coverage feature for debugging. You should only use it if you want to have a coverage of Phink itself. For instance, if you’re planning to contribute to Phink, or to debug it.
cargo run -- harness-cover
Be aware that this is primarily for those who want to dive deeper into the coverage of Phink and is not generally necessary for regular debugging.
Support channels
You can find us on Discord. Alternatively, you can message me on kevin[🎩]srlabs.de.
Happy fuzzing!
Benchmarking
Benchmarking provides insights into Phink’s performance in real-world scenarios, in order to vizualise its efficiency
and
fuzzing ink! smart contracts. Below are the benchmark results for various smart contracts, detailing
coverage, speed, corpus size, and the potential usage of generate-seed.
Each contract were fuzzed for maximum a day.
Statistics (especially average speed) are given for one core only. The coverage percent is calculated using the
number of
lines covered divided the number of reachable lines, as a percentage.
⚠️ The point of the benchmark is to demonstrate how much coverage is reachable within a day of fuzzing without doing proper seed creation. In a real fuzzing campaign, the developers would aim for 100% coverage, by creating seeds, adding
GenesisConfigvalues, more (E2E) tests extracted withseed-generator, etc.
Benchmarks
| Contract name | Coverage percent | Average speed (execs/sec) | AFL++ corpus size | Using Phink seed generation |
|---|---|---|---|---|
| abax_governor | 48% | 1500 (early phase) and 100 (late phase) | 1639 | NO (no tests available) |
| erc1155 | 89% | 1300 (early phase phase) and 140 (late phase) | 949 | YES (without E2E) |
| multisig | 91% | 1400 (early phase phase) and 113 (late phase) | 1524 | YES (without E2E) |
- Github for
abax_governor: AbaxFinance/dao-contracts/tree/main/src/contracts/abax_governor - Github for
multisig: use-ink/ink-examples/blob/main/multisig/lib.rs - Github for
erc1155: use-ink/ink-examples/blob/main/erc1155/lib.rs
Dummy benchmark
The dummy benchmark involves a simple nested if-condition. It acts as a reference to ensure that the fuzzer is effectively coverage guided. The results for this benchmark are as follows:
- Average speed: 7,500 executions per second in average
- Number of cores used: 10
- Time until invariant triggered: 48 seconds
- Stability: 99.43%
- Fuzzing origin: false
- Final corpus size: 12 seeds
Dummy logic
The logic tested in the dummy benchmark can simply be represented that way:
if data.len() > 3 && data.len() < 7 {
    if data.chars().nth(0).unwrap() == 'f' {
        if data.chars().nth(1).unwrap() == 'u' {
            if data.chars().nth(2).unwrap() == 'z' {
                if data.chars().nth(3).unwrap() == 'z' {
                    self.forbidden_number = 42;
                }
            }
        }
    }
}
Contracts
ERC-1155
The ERC-1155 contract is a standard for creating multiple token types within a single contract. It allows for the creation of both fungible and non-fungible tokens and enables batch transfers, making it easy to transfer multiple tokens at once.
Multisig Wallet
The Multisig Wallet contract is a multi-owner wallet that requires a certain number of owners to agree on a transaction before it can be executed. Each owner can submit a transaction, and when enough owners confirm, it can be executed.
AbaxGovernor
The Abax Governor contract is a governance contract that allows for staking of PSP22 tokens in exchange for non-transferrable PSP22Vault shares (votes). It enables users to propose and vote on proposals, with the number of shares held by a user determining their voting power.
Explanation of terms
-
Coverage: Represents the percentage of the code that have been executed during the fuzzing campaign. Higher coverage indicates more thorough testing (the higher the better).
-
Average speed (for 1 core): The number of executions per second that the fuzzer can handle on a single CPU core. As a reminder, one execution contains multiple calls up to
max_messages_per_exec. -
AFL++ corpus size: The size of the corpus generated by AFL++ during fuzzing. A larger corpus implies a diverse set of inputs to test the contract.
-
generate-seed usage: Indicates whether
generate-seedwas used to seed the initial tests. This depends if the contract include tests or not.
Environment details
- CPU: AMD EPYC 7282 16-Cores
- Operating System: Linux 5.4.0-189-generic #209-Ubuntu x86_64
- Phink Version: 0.1.4
Contributing to the benchmarks
We encourage contributions to our benchmarks! If you have a contract you would like to see benchmarked, please submit a pull request to our repository.
FAQ
Why the name ‘Phink’ ?
Mystère et boule de gomme.